
9 Editing Tools in MS Word that Writers Overlook
They’re not just for editors

Image credit: NordWood Themes on Unsplash
Many writers who use MS Word have never bothered with the “Review” tab unless they’re running the spell checker. However, there’s a whole handful of wonderful tools at your disposal—all of them accessible from that same tab—that will help you polish your writing and streamline the editing process.
For this tutorial and examples, I’m using Word in Office 365. I also have MS Office 2016 on my laptop, and the two versions are virtually identical. Microsoft still supports Office 2010 and anything newer, but if you’re attached to an older version, some of my examples may look different than what’s on your screen, and you may not have all the features of the newer versions.
In the ribbon across the top of a Word document, you can find everything your document may need, from font setup to the help screen. The Review tab is where you can find what we’ll be talking about here.
On my ribbon, in the Review tab I have Proofing, Speech, Accessibility, Language, Comments, Tracking, Changes, Compare, Protect, Ink, Resume, and OneNote. Tracking is what I use the most, but for flow, let’s start from left to right and cover the basics.
Proofing
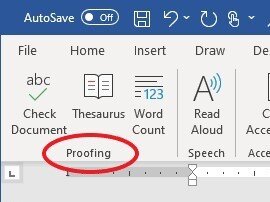
In the Proofing section, as you can see, you can check your spelling, use the thesaurus, or find the word count of what you’re working on (total words, lines, paragraphs, pages, and characters). What you might not realize is that you can set your preferences for what is examined and what is ignored. To do this, click on the “File” tab in the upper left, and go to “Options” on the file page (mine is at the very bottom left).
Options > Proofing
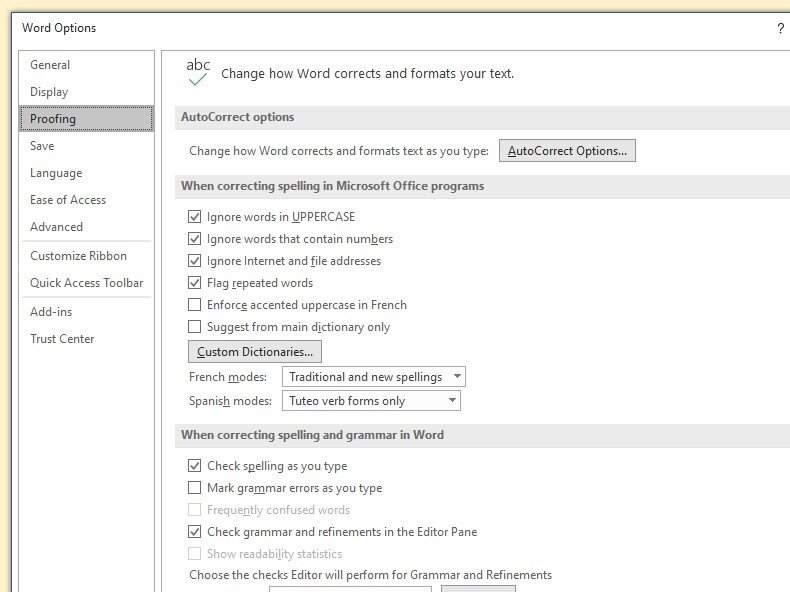
Here, you can tell Word whether you want autocorrect to do its thing or leave you alone. You can customize the autocorrect to only show options for certain things, like when you accidentally type two capital letters at the beginning of a word. Do you want your fractions to be adjusted to tiny fraction characters, or do you prefer just the numbers you’ve typed, full size?
Clicking on the autocorrect options will also allow you to choose, for example, whether the letter “c” with parentheses around it will change to the copyright symbol or not when you hit Enter, or it can replace text as you type “teh” instead of “the” if you’ve told it to.
You can tell it to ignore certain words, to flag repeated words, to check spelling and grammar or to leave that part to you. You can customize your dictionary (especially helpful to fiction writers who love those epic fantasy names!) and you can even tell it which version of French (traditional or new spellings) you prefer.
A bit of work on the front end will save you a considerable amount of time while writing and self-editing.
Speech
The Speech option is fun. Sometimes, when I’m writing, I can gloss over things I’ve missed because I know what I intended to write. Or maybe my eyes are tired, or maybe I’m just looking for a way to read something in a different way so I pay attention from a unique angle.
This is where the Speech option comes in handy. It reads the document aloud for you. That’s it. You can’t get any simpler than that. But having an impersonal bit of technology read to you is often the easiest way to spot lingering errors. That voice will only read what’s written—and not a syllable more—and it won’t put any inflection where there’s no punctuation.
Accessibility
If you’re putting together a document that needs to be accessible to people with disabilities, this is a great tool to make sure you’ve taken all factors into account. At the bottom of your document, the status bar will tell you how you’re doing as far as accessibility.
Most of my documents get the “good to go” message because they are black text only, and have no images or charts. However, if you insert any visual content, the accessibility checker will remind you to include alt text for an image, or to use a particular text format for anything that’s color coded, just to list two examples. Well worth checking into.
Language
This is where the author can set the authoring and proofing languages. If you write in English, do you write in US English, UK English, Australian English, or yet another variant? Do you write in Egyptian Arabic, Algerian Arabic, Saudi Arabic, or some other type?
This is where you can go to customize those settings so the spell-checker doesn’t keep flagging supposed misspellings, based on an inaccurate idea of what language you’re writing in. You can also add additional languages here. The language you’ve chosen will show up on your status bar at the bottom of the document as well.
Comments
You can add a new comment in the document margins by typing, or use “Ink Comment” to write freehand (helpful if using a stylus with a tablet or laptop/notebook). The comments can be helpful for editors who wish to explain a change they’ve made, make a suggestion without adding it into the running text, or query the author about a particular portion of the document.
The author can reply to those comments, leave a comment of their own, or delete them if the question/comment has been resolved. If you’ve used the Ink Comment feature, you have the option in the review tab to Hide Ink so you can print your document or spreadsheet without all the little markings you may have made for yourself.
Track Changes
Tracking > Track Changes
This is the biggie that every writer should learn, because it’s the tool editors use to work on manuscripts and communicate with writers throughout the documents.
When you toggle Track Changes on (by clicking on it via the route shown above), everything you do from that point will be documented. Deletions are marked with a strikethrough, and additions are marked with an underline.
The default color for markup is red, but if you don’t like “all that red, all over the place,” you can change the colors to suit your own preferences by clicking the arrow in the lower corner of the Tracking block (found as noted above). This will open a window called Track Changes Options.
If you click on Advanced Options from there, you’ll find a number of choices for personalization, but the most important and basic ones can be found at the top, where you can decide what color you want your markup to be. I’ve chosen turquoise for insertions and a light gray (25%) for deletions. I’ve found that blue is a little less intimidating to look at, and gray helps the deletions to sort of fade into the background (less of a distraction when showing all markup).
Markup options
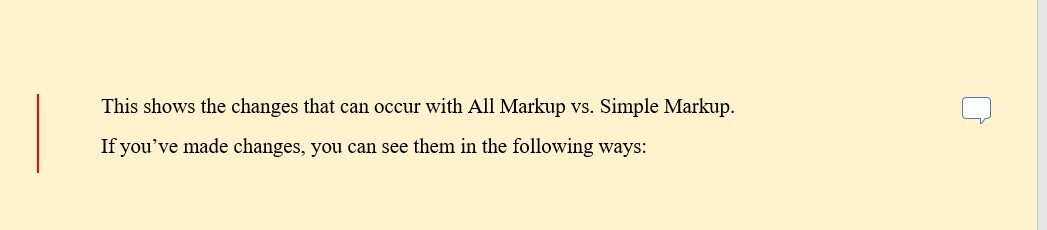
Here’s my sample of original copy with typos that will need fixing (I’ve tinted the page color so it shows up better here—I often change the page colors to a pale blue or similar to reduce eye strain when working on a longer manuscript):

Simple Markup looks like every change has been accepted, but you can still view comments by hovering, and there’s a small red line in the margin to show where changes have occurred.
You can toggle between All Markup and Simple Markup by clicking on those lines, which turn gray when the All Markup setting is on.
All Markup will show you . . . well, all the markup. Each change you’ve made will show in the text, and all comments will show in the sidebar.

No Markup allows you to see how it looks if you make all suggested changes, but shows no comments or “look here to see what I did” lines in the margins. So basically Simple Markup without anything other than text.
Original, of course, shows your original copy.
The Show Markup section in the tracking area can also be toggled to show only markup made by certain people. This is helpful when multiple people are working on the document, or if you only want to see changes you made, but not the changes your editor made (or vice versa).
Changes
This section is where you can hop through the changes you’ve made, by clicking on “Previous” or “Next” and accepting or rejecting them.
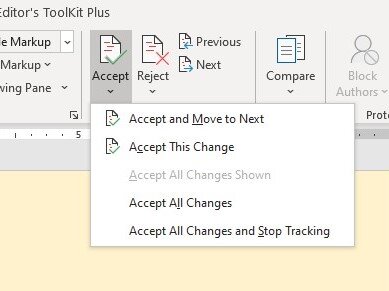
As the menu shows, you can accept or reject changes individually, accept one and hop to the next one, or accept all of them in a single click. Since I’m usually working on someone else’s (longer) manuscript, I rarely accept all the changes at once.
I toggle on and off for “silent” changes like extra tab returns, fixing double spaces, and changing straight quotes to curly, because no one wants an MS full of mandatory markup overshadowing the edits they should pay attention to.
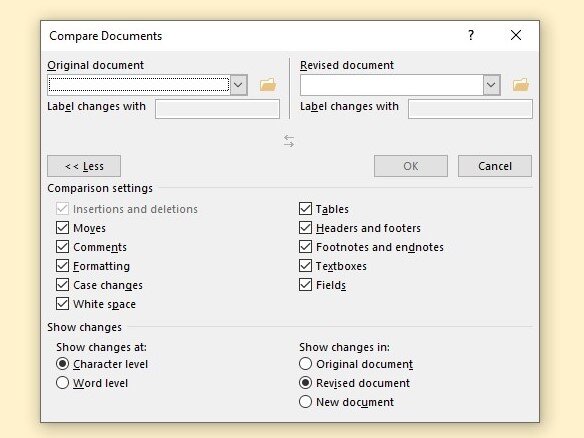
Compare
If you’re not sure of all the changes that were made to a document (or if you want to see the silent changes made), you can compare the current document with any previous version.
In the Compare Documents menu, you can load your current document in the “Revised document” spot, and add the previous version (typically your original) and click “OK” to get started. You’ll see both versions in a sidebar, paragraph by paragraph, and the center of your screen will show a full-size version of the document with all differences in your chosen insertion/deletion colors.
If, for example, you’ve made adjustments in addition to those your editor made during the first round of edits, they’ll be able to see what you’ve done by comparing what they sent you and what they received back from you. If large chunks of text have been added, or if errors have been introduced in the text, they’ll show up and alert the editor to how the suggested edits were handled.
Word Options
I mentioned the Options section earlier when talking about setting your proofing or language preferences, but you can also get there from the File tab: File > Options to get to the options box shown in the first picture (see Proofing section).
The Word Options box is one of the most handy things you can start with when getting ready to write or edit a document. You can adjust what’s displayed on your page, showing or hiding a number of helpful markings. You can also choose what’s displayed on your ribbon or on the Quick Access Toolbar above it. Mine is customized with the AutoSave, Save, Undo, Redo, Find, and View Macros because I use those frequently enough that I don’t want to waste time searching for them or programming customized keystrokes.
And finally
There are even more helpful tools among the above-mentioned sections that you can explore at your leisure. But if you’re serious about writing, and if you want to self-edit as thoroughly as possible before having a professional editor go through your work, using the tools built right into MS Word can be an economical way of getting your manuscript in tiptop shape. Open a new document and explore!
